Some notes on the controls and connectors
Rotary Potentiometers
With the exception of the pitch/detune I've decided to use all new rotary potentiometers. For the relatively small price, the peace of mind is worth it.
I need T18 6mm shafts for the knobs to fit onto and there are 11 in total. 1x 50KB for the vibrato delay; 4x 10KB for vibrato depth, sustains and Orchestra speed; and x6 100KA for the rest.
I've decided to go with the vertical mount 9mm Alpha pots from Thonk.
https://www.thonk.co.uk/wp-content/uploads/2017/12/Alpha-9mm-Vertical-T18-RD901F-40-15K-B50K-0057.pdf
9mm-Vertical-T18-RD901F-40
9mm - Approx 9mm body
Vertical - PCB mounted vertically.
T18 - 6mm 18 tooth, split, splined shaft.
RD901F - Model number
40
Pins - 1mm hole, 2.5mm spacing.
Hole - 7.1mm
After getting these in my hands I realised that the shafts are far too short to fit to a sub-panel and through the front-panel. I fitted one to my old temporary front-panel.
It actually fits really well. The skirt on the Yamaha knobs covers the nut and washer and is just far enough away from the panel to work. This means I don't need a sub-panel for these rotary controls at all.
However, if I want to use any other knobs, such at this one, which does not have any skirt to hide the washer
...then I will need a different pot with a longer shaft.
And the pitch-detune dual-concentric control still need a sub-panel,as I plan to reuse the original part.
Slide Potentiometers
The slide potentiometer is from Bourns.
 |
| Bourns 60mm slide potentiometer |
https://www.bourns.com/pdfs/PTA.pdf
PTA4543-2015DPA103
PTA
45 - stroke length mm (45 = body length 60mm)
4 - no dust cover - 5 = dust cover
3 - single gang
-
2 - Pins facing down (PCB)
0 - No detent
15 - Lever length
DP - Lever style
A - Audio Taper
103- 10KOhm
Mounting is difficult. I would like to screw them in place, but the screw has to go into the face of the slider. This means that the height of the lever is critical.
Assuming the knob needs 10mm of the 15mm available and the front panel is 3mm, there is almost no space left for a sub-panel and screw. The sub-panel would have to be 1.5mm (thinnest available from Schaeffer) and the screw would be counter sunk. This sub-panel would then be bolted tight to the front-panel although, in theory, it could be bolted to another sub-panel behind and pushed into the back of the front-panel.
I have ordered some small 2M screws and think this might be the way to do it.
MIDI DIN Connectors
I'm not a fan of most cheap DIN connectors which have two fixing holes, either side of the socket. I have a bunch of these in a drawer but I wanted something nicer.
Instead, I looked for a part that fits in from the front with a single nut fixing from behind, and found one at Farnell.
http://uk.farnell.com/deltron-components/650-0500/socket-din-screened-180deg-5pole/dp/1193837
Oh, but it was pricey. Eventually I found that CPC, who are part of Farnell had then from half the price. Go figure.
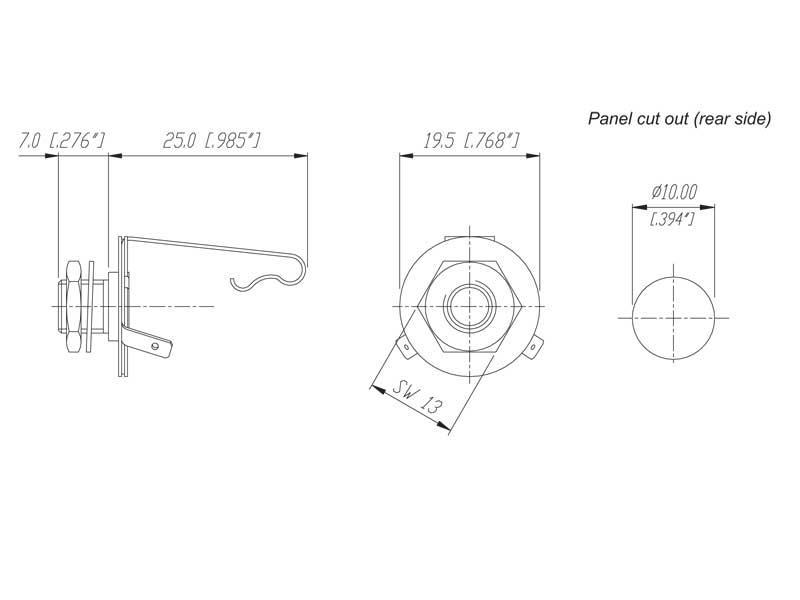
1/4" Jack Sockets
These are Neutrik, so ought to be pretty good.
These were also cheaper at CPC, but I'd already ordered from Farnell.
http://cpc.farnell.com/neutrik/nys229/1-4-jack-panel-socket-mono/dp/AV09109
Dimensions
https://www.axecaster.co.uk/images/NYS229_specs.jpg
Cliffcon Miniature ZC Series
I've covered these before in the power supply posts
http://www.cliffuk.co.uk/products/cliffcon/zcseries.pdf
PowerCon
I've covered these before in the power supply posts
Drawing+NAC3MPA-1-WOT.pdf


